I've been asked by a friend about building a resonator ukulele for him and have starting researching what goes into building one.
In a resonator you don't want the "box" adding to the sound so it's "over-built" compared to a standard instrument. In this way the cone gets to generate all the sound.
I've found multiple sources for cones and coverplates, from National, Republic, Delta and others.
At this point I'm leaning towards either National or Delta, I figure if I'm putting the effort into doing this right then I don't want to go too cheap. Also, these two are interchangeable (if I specify the size correctly) so it's easy to swap between them later if desired.
The other piece I want up front is the sound well that the cone sits on. There are several ways to go on this but I'm looking at tubular plywood, like a drum shell or tambourine ring, to support the cone. I've seen this done for guitars and it will really support the cone while also locking the top/back together to stop any unwanted vibration.
Once I get these I can work on the rest of the design to get body size and neck angle correct. I'm thinking about sizing this to fit a specific case and hoping to make it a soprano but will bump it up to concert if necessary.
After pricing a few components my thought is that I might do 3 of these simultaneously, keeping the bodies identical but using different cones so I can compare them. If I go this route then my friend will get his pick, I'll keep one, and one may be up for grabs, we'll see. I don't expect to get much done until next spring at this point, mostly design and planning.
In the mean time, lots of uke playing with StrumMn!
Check http://strummn.shutterfly.com/ for dates/times and come join us!
Saturday, October 16, 2010
Sunday, August 15, 2010
Logo madness?
Got a custom branding iron and burned the logo onto a piece of leather.
Then did a little braiding to make something to hang it with.

Now I've got it attached to my latest uke.

Then did a little braiding to make something to hang it with.

Now I've got it attached to my latest uke.

Saturday, July 31, 2010
next meeting, MONDAY Aug 2, 7-9pm
Java J's on Monday Aug 2, 7-9pm.
I'm hearing that others are having problems with Shutterfly. I sent them a msg and we'll see what kind of response we get. We might be looking for another home again... I'm about ready to just buy a URL and pay for hosting so we don't keep going through this.
I'm hearing that others are having problems with Shutterfly. I sent them a msg and we'll see what kind of response we get. We might be looking for another home again... I'm about ready to just buy a URL and pay for hosting so we don't keep going through this.
Friday, July 30, 2010
accessories!
My daughter embroidered my new logo on a hand towel! I think I'll keep it in my case to wipe down my ukes. Pretty nice!


Sunday, July 18, 2010
Logo for my ukes?
I've been playing with the idea of a logo for my ukes.
Here is a pic of what I came up with.

It a stylized version of my initials. I took the K that I used for my tenor headstock, then I freehand digitally traced the outline of a uke picture for the backwards B. It was then resized/stretched to fit with the K and the soundhole/bridge added for the loops of the B. I added the 4 extended uprights and then cut/paste the peghead right from the old StrumMn logo and tweaked it to match.
It may be similar to other logos out there but nothing is copied from them.
I'm not putting it on the front of my headstocks but it may go on the back of the headstock or inside the uke.
I found a place that will do it as a 2cm x 2cm "branding iron" that clips right onto a Bic lighter so it can be burned in, I like the idea.
Here is a pic of what I came up with.
It a stylized version of my initials. I took the K that I used for my tenor headstock, then I freehand digitally traced the outline of a uke picture for the backwards B. It was then resized/stretched to fit with the K and the soundhole/bridge added for the loops of the B. I added the 4 extended uprights and then cut/paste the peghead right from the old StrumMn logo and tweaked it to match.
It may be similar to other logos out there but nothing is copied from them.
I'm not putting it on the front of my headstocks but it may go on the back of the headstock or inside the uke.
I found a place that will do it as a 2cm x 2cm "branding iron" that clips right onto a Bic lighter so it can be burned in, I like the idea.
Saturday, June 26, 2010
DONE!
Ok, the finish has sat for a week so now it's time to scrape it back and glue on the bridge.

Bridge glued, now tape it off for a quick coat of Teak Oil on the redwood bits.

Oil wet but tape removed so it won't wick underneath.

Trying to get a shot of the reflections... it's shiny!

Strung up and looking good, just needs the strings trimmed.

Lovin' the tail graft.

A minor issue here but I'm the only one who knows...

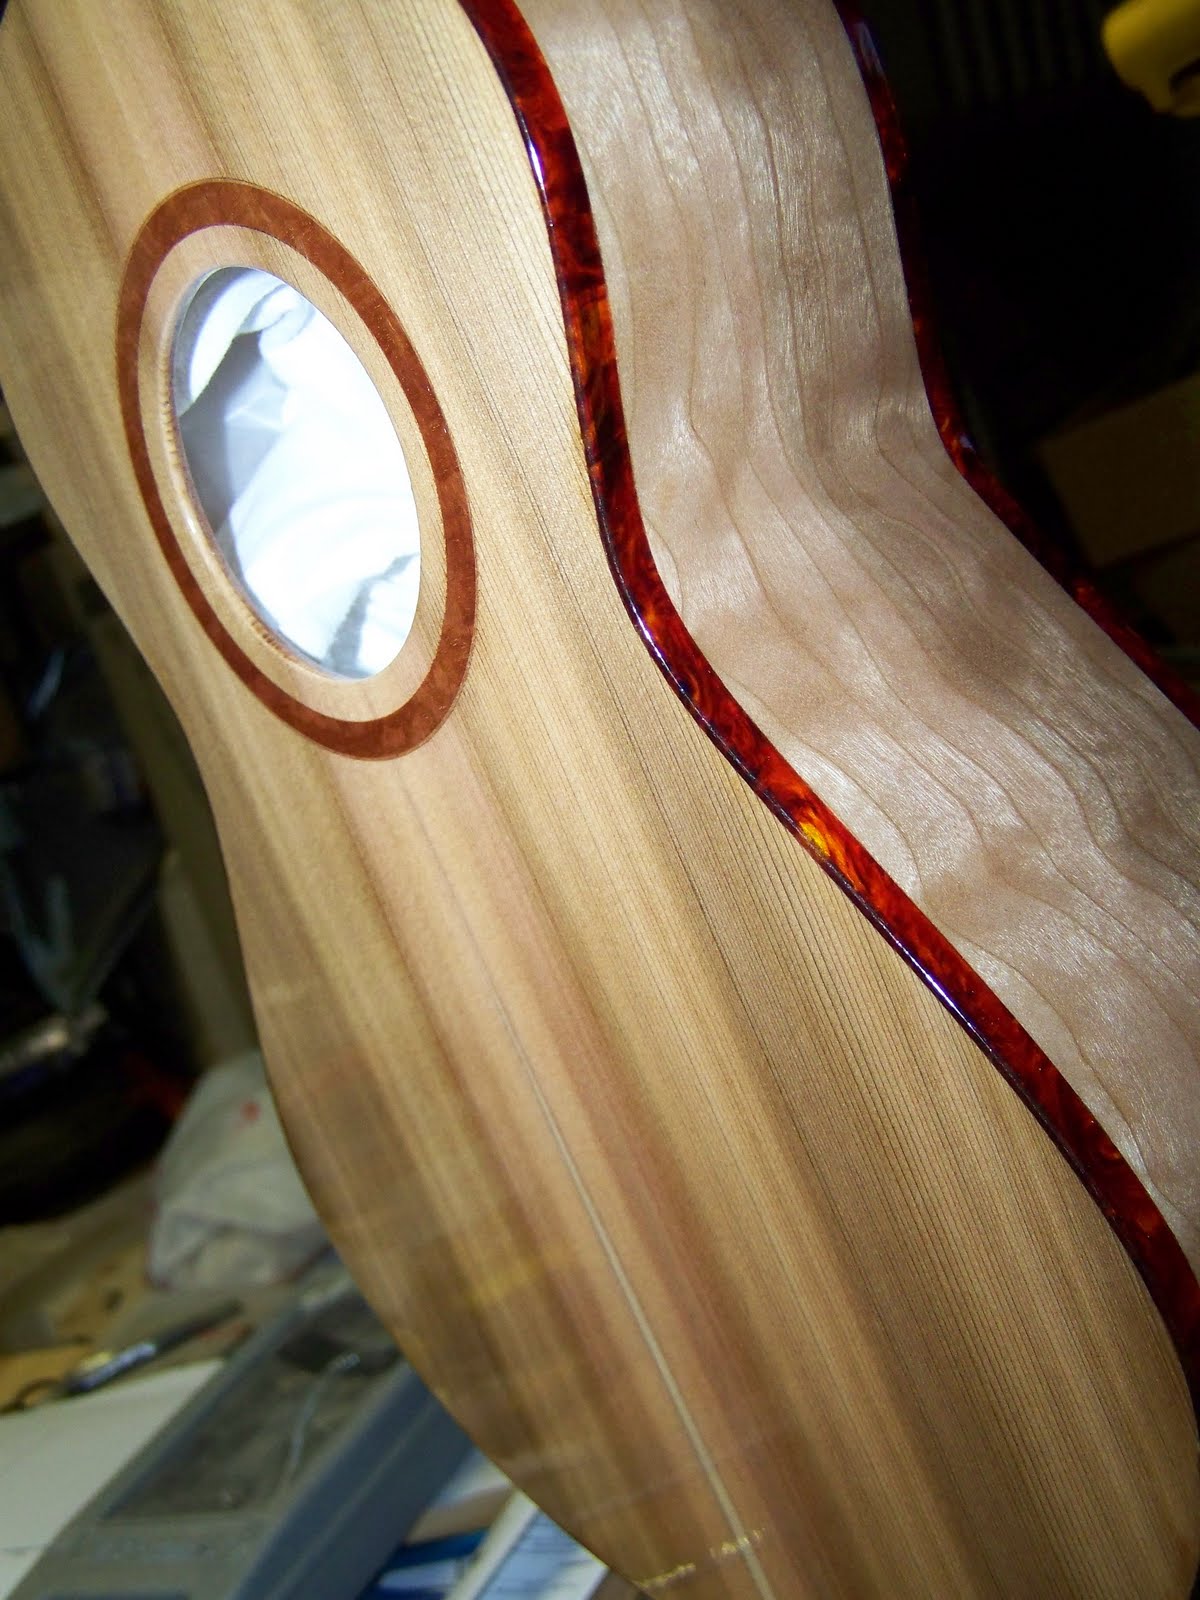
More Sheoak in the rosette turned out nice.

The zipper and skunk stripe line up perfect!

Grover friction tuners seem to work really well!

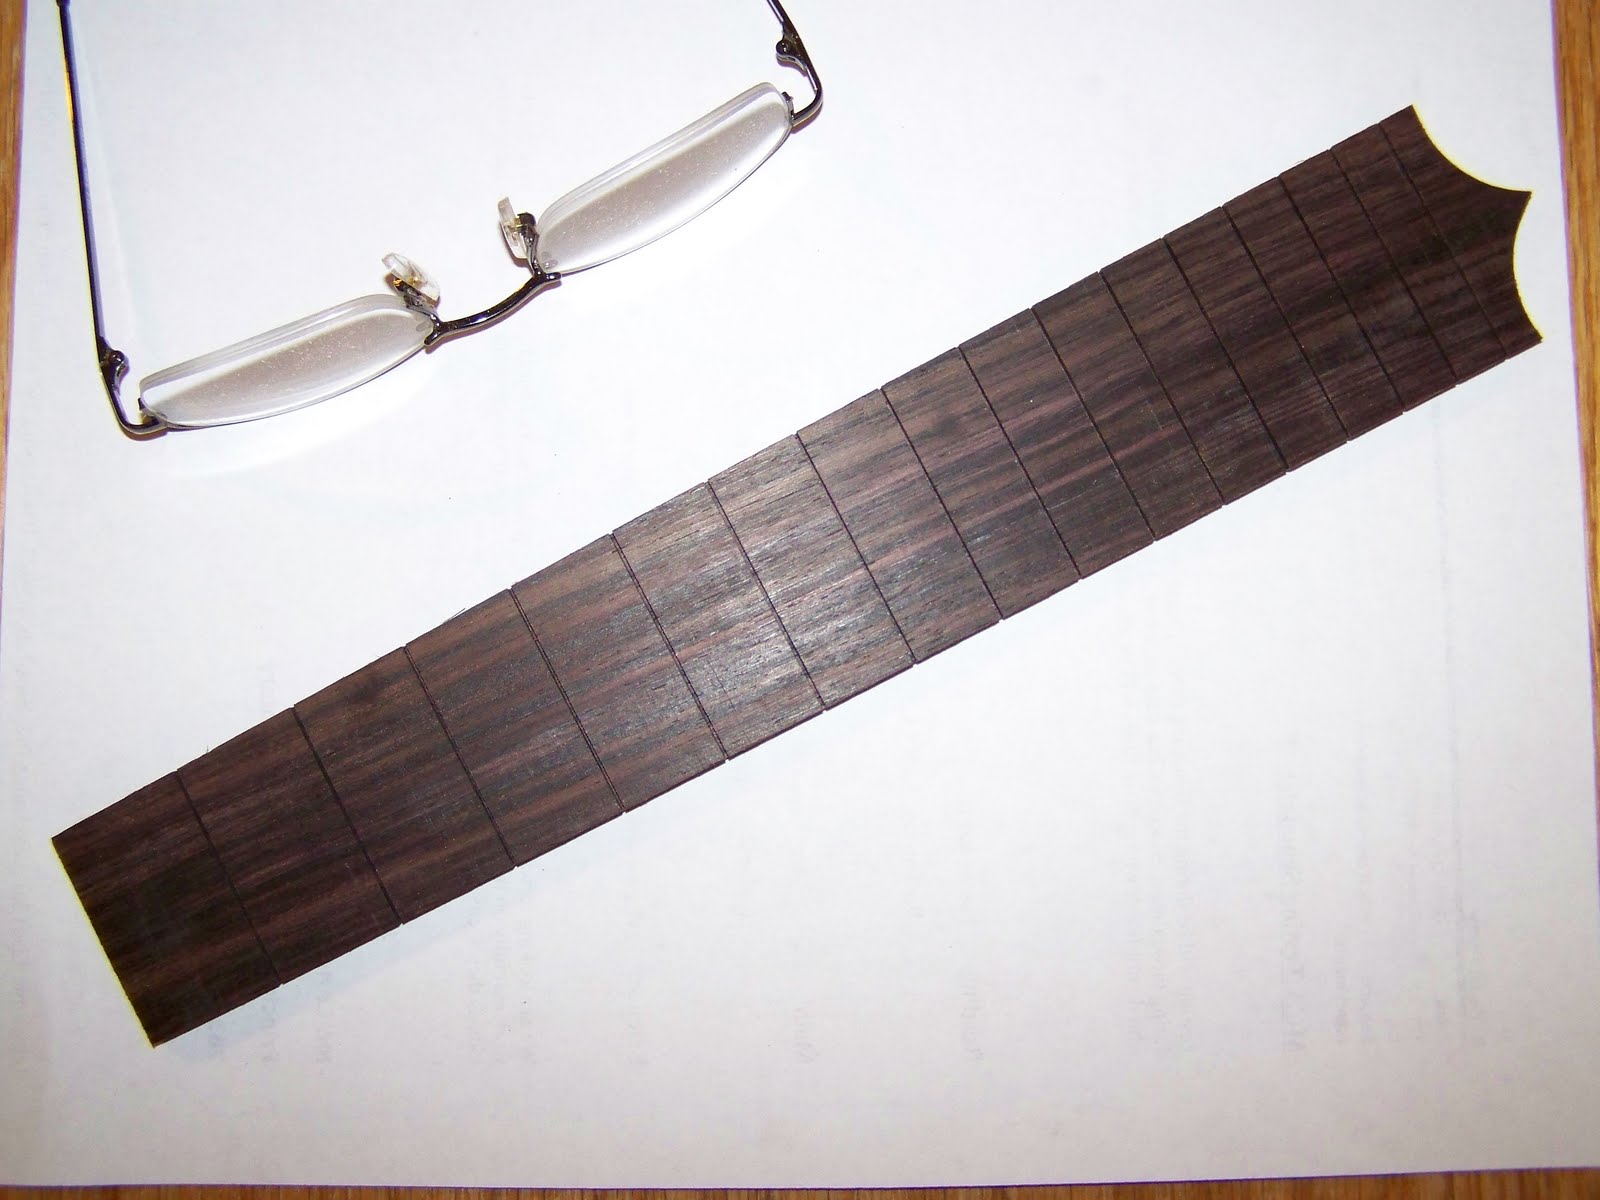
Time to play! The fretboard feels so much wider and the frets so far apart, this will take some gettin' used to, but it turned out nice and sounds good so far!

Bridge glued, now tape it off for a quick coat of Teak Oil on the redwood bits.

Oil wet but tape removed so it won't wick underneath.

Trying to get a shot of the reflections... it's shiny!

Strung up and looking good, just needs the strings trimmed.

Lovin' the tail graft.

A minor issue here but I'm the only one who knows...

More Sheoak in the rosette turned out nice.

The zipper and skunk stripe line up perfect!

Grover friction tuners seem to work really well!

Time to play! The fretboard feels so much wider and the frets so far apart, this will take some gettin' used to, but it turned out nice and sounds good so far!
Tuesday, June 22, 2010
sanding and polishing!
Tonight I wet sanded with 600, 1000, 1500, and 2000 grit. I would have gone to 4000 if the store had it.
Then I hit it with Maguire's rubbing compound. Still need to use their Scratch-X but boy, does it shine!
So, tomorrow night I "scratch" it, then attach the neck. Then I measure for bridge placement and remove the finish so I can glue on the bridge. After that it's pretty much just setup; filing nut slots, fitting tuners, etc.
I'm shooting to bring it this weekend to the Lil Rev workshop even if the strings are still stretching!
It's been a "long and winding road" on this uke but if it plays half as good as it looks I'll be thrilled, and with the tap tone and lightness I'm expecting it to be a great player anyway.
Saturday, June 05, 2010
Letting finish rest before polishing
Have to wait a week before sanding with 600-2000 grit and polishing.
You can see a bit of reflection on the lower left. It really shines but isn't smoooooth yet.
It won't be quite like the mile thick commercial finishes but I think I'll be happy as long as I don't sand through!
Sunday, May 30, 2010
Spraying finish
Well I started spraying KTM-9 finish today, finally. I was a little paranoid and was putting it off until I had plenty of time to work through issues without rushing.
The first coat went well, I've got a run on the second that will need sanding. The 1st coat also really raised the grain and left it feeling rough so a little sanding after the 2nd coat dries will help anyway.
I've got pictures but it's tough to see anything, I'll review after I upload to my laptop and post any good ones. It's nice to get started on the finish after so long, I really want this complete early in June so I can have it strung up before the June 27 Lil Rev workshop.
I also shaped my rosewood bridge yesterday! I still need to drill holes (string through style) but it should work great! Pictures to come...
Brian
Saturday, April 24, 2010
Fretting about things... :-)
Fret slots cut. Using my new setup is really slick.

Frets installed but not yet trimmed. I had to use super glue as the slots are just a hair wider than previously. Also the fret wire came curved and my fretboard is flat so the wire wanted to pop up in the middle.

All trimmed up. I clip, file, and then sand to get the fret ends smooth and soft to the touch.

A new trick I learned if you look close. I put a couple staples in the neck and then clipped them off very short. The sharp nubs hold the fretboard in place while gluing so it doesn't squirm all over when clamping up.

Here you can see the corresponding holes in the bottom of the fretboard. I just located the fretboard and pressed it into place (ok, I had to use a clamp to drive the nubs in, that rosewood is HARD).

All clamped up and it didn't move a bit, this is slick! Thanks to Kathy Matsushita's blog for this trick.

Lookin' good! The glue cleanup was easier with this method too. Time for some final sanding and I'll be ready to spray a finish.

Sunday, April 11, 2010
1 step forward!
I'm finally back into the garage today and after some cleanup I was able to build a jig for fret slotting. Then I was able to slot a fretboard in just a couple minutes and it's perfect.
Building patterns for different scale lengths should also only take 5-10 minutes.
This is amazing. Next step will be to taper the fretboard and then put in the frets.
Before you know it I'll get this tenor finished up, it's been a long haul.
Building patterns for different scale lengths should also only take 5-10 minutes.
This is amazing. Next step will be to taper the fretboard and then put in the frets.
Before you know it I'll get this tenor finished up, it's been a long haul.
Tuesday, February 16, 2010
1 step forwards, 2 steps back
Well, I took an extra vacation day this past weekend with the hope of getting a few things accomplished. One of those was getting my fretboard slotted, frets set, and fretboard glued to the neck.
I've been putting it off, it's one of those mental block things. I've done it 3 times before and they turned out great but it's picky work and this time I was working with a pre-tapered board so my jig wasn't usable as in the past.
Anyway, I finally got to it yesterday and got it slotted, then set it aside. Today I gathered up my fretwire, hammer, and special fret-setting tool to "get 'er done" but before I got started I got a big surprize! Frets are supposed to get narrower as you go up the board but ONE of my slots was off. The pattern I use had slipped, along with the jig not lining up correctly on the tapered board.
It's ruined.
At least I noticed before fretting or gluing it up!
So... recovery time, what to do, how to proceed. No more of this hand cut slot stuff for me. I'm building a new jig and ordered a fretting blade for the table saw, serious stuff ($$), and a new rosewood blank that should do 2 ukes.
I also ordered some new wood, enough to do a guitar body (I've wanted to try making one but don't worry, ukes still come first), old growth sitka spruce and goncalo alves, should be sharp!
.


Brian
Tuesday, January 19, 2010
GRRR!!!
This site has been getting lots of spam comments lately so I've had to constantly search them out and delete them. So for a while I'm going to turn on comment moderation once again.
If you leave a comment it won't show up until after I've allowed it through which is usually once a day.
Another good reason for the StrumMn Ukulele Players to use the nexo forum instead for our communication.
Then again, it you have real comments on anything on this site I do love to hear from you, so don't hesitate to leave a note.
Brian
Subscribe to:
Posts (Atom)